Photoshop Photo Booth Save The Date Strips
How to make a fake photo booth with Photoshop
We've shown you one way to make a Save the date with a photo booth. Another photo shop technique that can be used by anyone who doesn't live near a photo booth or simply want to save costs by creating their own vintage photo booth look with a regular camera, a plain background and a little Photoshop knowledge.
You will need
-
Digital camera
-
Plain background - wall, closed curtains,
-
Photoshop
-
White cards and a marker
-
You can download these Photostrip brushes made in CS2. They have great texture and are free for your personal use.
 Step
1 - Prepare your cards
Take your white cards and with a marker pen write on each the words 'Save', 'The' and 'Date' on three separate cards as well as the date of the wedding on the last card.
Step 2 - Set up your photo booth and start snapping
Set up the area where you will take your photos. The best place around the house is under a covered veranda or porch on a sunny day. Lots of light and no harsh shadows. If you don't have an outdoor under cover area then get close to a large window that is letting in lots of light. Set up your backdrop by taping it with masking tape or tacking it to a wall. If you are going to use a sheet then please iron it first!
Get the a friend to take your photos and set up the camera on a tripod, table or chair. Take a couple of test shots to make sure you have it set up right then Get snapping. Grab you signs, get your smiles and funny faces ready and start taking lots of pictures
Note: your background can be any color as long as it is plain and not busy. If you are going to be making black and white pics then give some thought to contrast. ie. If your background is dark, wear light colored clothing and vice versa.
Step 3 - Upload to photoshop and work your magic
Create a faux photo strip with your photos in Photoshop. There are ten million different ways to skin this cat and here is one that is pretty simple to describe. (you can also download the free brushes above)
-
make a new document around 40mm x 205mm (these are the approximate dimensions of the old school photo booth strips)
-
Create a white layer for the strip itself (call it photostrip).
-
Use the selection tool to make rectangle shapes to delete from the white layer.
-
Open up your photos and drag them into your document under the photostrip layer and resize it accordingly.
 William's
Photoshop Save the Date
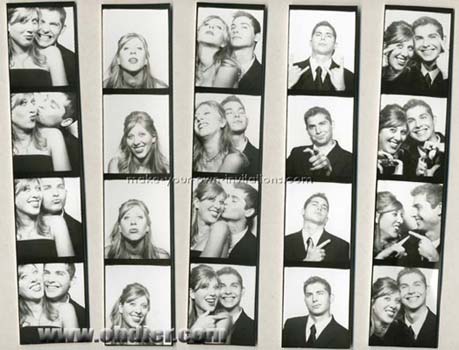
These cool save the date cards were also made with a graphic editing software program. To assemble the cards I simply printed 6-8 per 8x10 sheet.
Next, I used adhesive backed magnetic sheets and attached the prints. Lastly I cut each strip out and sent it in the mail.
A stencil font was used to add the wording 'Save The Date'
We still have friends and family that use our magnetic strips
on their fridge.
Made by William Dohman
St. Paul, MN
William and his fiancé trying out a series of different poses for their photo booth strip. I love their final selection.

 Our Customized photo
booth cards
If you really want a photo booth themed Save the date but you don't have the resources to make your own photo booth strip then why not order one of our customized photo booth save the date strips.
We will use your photos to make a 1.5" x 7" booth strip. We'll also put 3 individual strips on to a 5"x7" .jpeg file so you can take it to your photolab of your choice to print. Or if you like you can request to fill an 8.5"x11" pdf file with 6 photo strips to print.
You will need to send us 3 to 4 photos and your preferred wording and we will do the rest...


