Japanese Wedding Invitations
 I
love wedding invitations made with Japanese Washi papers. They ae so delicate
and the designs and patterns that you can get are amazing. Cherry blossom are
another Japanese theme for invitations These Japanese invitations are made with a touch of Asian
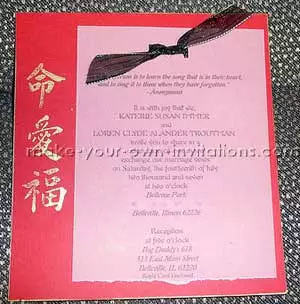
design with kanji lettering artwork stamped in gold on to bold red red card
and finished with a length of black ribbon.
Supplies to make Japanese wedding invitations
-
Red cardstock for the base
-
White vellum paper
-
pink
-
gold pigment ink pad
-
ruler
-
computer and printer
Prepare card
I cut red cardstock into desired size with a paper cutter. (If you are mailing them in envelopes, make sure they fit in the envelope before you make more than one)
Then I inked gold ink from a stamp pad around the edges, just hold the ink pad against the edge of the cardstock and wipe down. Don't worry if its a little messy, or not perfect. If you wanted perfect, you'd buy your invitations :-)
Print invitation wording
The invitation wording was printed on to the white velum, using Microsoft Word (or can be done in Photoshop), then they printed on a computer printer.
TIP: Make sure to let these dry over night, ink on vellum smudges very easily if it is not fully dry.
Decorate vellum paper
I created the texture on the vellum top layer. I created torn edges evenly by placing a ruler on the velum where I wanted to tear the paper, then with a firm grip on the ruler, I slowly rip down and towards myself. Do not do this freestyle, you must use the ruler for the best results.
Invitation assembly
I placed the printed vellum sheet over the cardstock where I wanted it on the right hand side and punched two holes at the top, side by side, through both layers with a hole puncher. Center the holes on the top vellum sheet.
For variation, you can get hole punchers that look like button holes from a craft or scrapbook store. These are great to use for 2 holes that are lined up with each other.
I cut 3 or 4 inches of black ribbon. I thread the ribbon down through the top left hole and back up the top right hole and tied the ends in a double knot. I put a glue dot from buygluedots.com under the ribbon at the back of the card so that the ribbon stayed in place.
Decorative Kanji symbols
Last of all I stamped a couple Japanese symbols down the side of the red cardstock. They were mailed in red envelopes with a Japanese symbol stamped on to the back.
All of these supplies can be bought at a local crafting or scrapbooking supply store. This idea can easily be adapted into other types of invitations such as baby shower or birthday party. Use your imagination and have fun! The possibilities are endless!
handmade by Becky Bokern
Belleville, IL

- More DIY wedding invitations
- Make a Save the Date Card


