How to make Tree Wedding Invitations
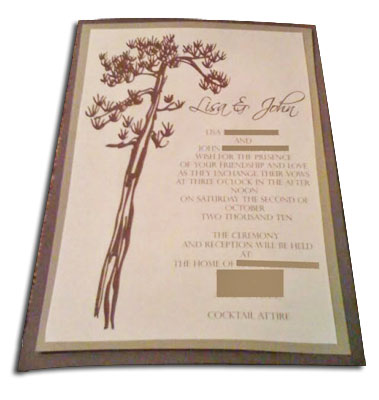
An invitation made with natural colors, chocolate and sage, imitating nature. They were made for a wedding ceremony held on a family farm. They would suit any wedding celebration with an outdoor theme including a forest wedding, park or even a casual backyard affair.

Supplies
-
Cardstock - precut card in colors of chocolate brown and sage green
-
Cream colored textured watercolor paper for the top layer from hobby lobby
-
Heat gun
-
Printer, computer, MS PowerPoint program
-
fonts used: Scriptina is the script font (free from dafont.com) & Perpetua Titling for the block font.
-
Adobe Illustrator to create a tree design, alternatively you can search for tree clip art or stock photography.
-
Microsoft word to create the invitation layout
-
Tape
Make the invitation
Step 1 - Create your design in Adobe Illustrator or Photoshop. The tree in this invitation is a chocolate brown color. You can also search for cheap clipart online that you can use.
Step 2 - Create your invitation layout in MS word. Insert the image of the tree on the left and use the text boxes to make the invitation wording on the right hand side. Use a brown color font the same as the tree image.
Step 3 - Once your invite has been checked for errors, print a test run onto scrap paper. Only when you are happy with your invitation should you print onto the cream paper
Step 4 - Assemble the invitation with the brown card on the bottom, then the sage green card and finally the cream layer on top.
Made by Lisa
Allen, TX
- More DIY wedding invitations
- Make a Save the Date Card


