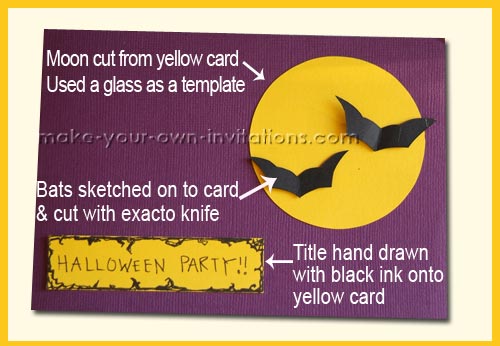
Homemade Halloween Bat Invitations

We wanted to make some quick and easy invitations for our 2012 Halloween party because, as usual, we had left off organising them until the last minute. One year I will surprise my family by having our invitations sorted with plenty of time to spare.... One day....
To make bat invites you will need:
- Purple card stock for the base (can be black, midnight blue)
- Yellow card
- Black card
- Exacto knife
- scissors
- Black fine nib pen
- Elmers all purpose glue (white pva glue) and a glue stick
- White copy paper and printer
Instructions
Step one
Cut a card from your purple base card stock and fold it in half. It can be any size as long as it fits into your envelope. For these cards I went out and purchased my envelopes from k-mart first and then measured my cards to fit.
Step two
Find a glass in your cupboard to use for a template for your moon. The bigger the glass the better.
Trace onto yellow card and cut out with a pair of scissors. Adhere to the card with a glue stick or the white glue.
Step three
Draw a basic bat shape on to your black card. They dont have to be to fancy, you can see that my bats are very basic and simple. They should be small enough to fit a couple of bats on your yellow moon.
Cut the bats out with an exacto craft knife.
Step four
Take one bat and fold the bat in half, fold along the crease. Unfold the bat and apply a thin line of white glue to the spine or fold of the bat and stick it to the card moon. Repeat for the second bat.
Step five
Cut a rectangle of yellow card and write "Halloween Party" on it with a black fine nib pen. Give it a decorative border as well. Embellish it further as you like.
Adhere the rectangle title banner to the bottom left of the card with a glue stick.
Done.
- More Handmade Halloween Invitations
- crochet bat invitation


